Tuesday, 28 June 2011

Finished Comic Strip


This is my finished comic strip. here also are some of my concept sketches which I imported using a scanner. I then edited them in photoshop and put them into a program called Comic Strip.

Wednesday, 15 June 2011

3D Animation

This is my finished animation, I decided to use my previous model in this animation as it is one of my best models that i have made so far. I started off by making the houses, i used a box and turned it into an editable mesh, i then duplicated the box and made it smaller to about the size of a door, i used a tool called pro boolean, which cuts a whole in an object, this is a good tool because normally if you deleted the polygon it would have a whole all the way through the model and this would not look good. After i had made the door I made several more "Booleans" for the windows, I then made a pyramid and molded it to the shape of the roof. After i had finished the basic shapes of the house I made a garage using the same techniques used before, i then added textures for the windows and doors, and made several duplicates for the houses on the estate. After that i made two boxes in the shape of a rectangle, this was to be the stands for the "Toll Booth". I then made another slimmer but longer rectangle for the roof, also i made a box in the middle of the road for the actual booth, I added a glass material to the top so it was see-through, and finally made two more rectangles for the barriers that raise up and down. Once i had made all the buildings and the scene was set up i started animating it. The animation is my tank driving through a "Toll Booth"; hitting a dead end,and then turning around in the road to drive back out of the estate. I think that my animation went well because it was quite easy to make the scene but I had some problems with animating it. The problems i faced were that i had lots of different ideas of animations that didn't work out. The first idea was to have a camera zoomed in onto a baseball bat in a practice cage, there would then be a baseball that fired out of the machine and the baseball bat would then hit the ball out of the cage. This idea didn't work because i had problems animating the acutal bat and the camera wasn't working. My second idea was to have my Tank driving down a foggy road and shooting at a building, the building would then explode and the Tank would carry on driving on. This idea didn't work because the exploding part went wrong and the building didn't crumble but instead fell off of the scene. So my last idea was the current finished animation of the Tank driving through the estate.I think that my animation went well because even though i faced many problems and had to change my idea twice, my animation still turned out how I wanted it to. If I could make my animation again I would add more frames so it didn't run so fast, also i would add more parts to the animation like research how to make glass smash, and have it driving through a building window.

Thursday, 9 June 2011

My 3d Max Animation - Textures

For Our next assignment we have to create an animation using 3d max and i have decided to use my previous tank model that i created and involve it in a scene where there will be houses being blown up. These are some of the textures i will be using for my animation, the textures will be : a road, a house texture, a garage texture, and a new and improved texture for my tank.

Wednesday, 13 April 2011

My Finished 3D Max Model


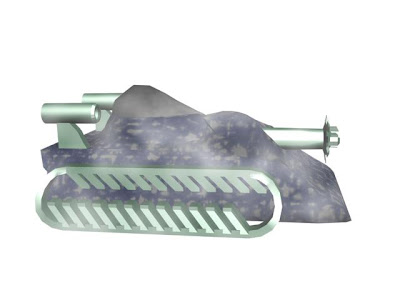
 These are some renders of my finished 3D max model. my model is some sort of alien type tank. to make my model i started off with a basic box shape for the body, I then converted the box to an editable mesh and pointed the front edge down slightly, i started off by looking at a picture of a real tank to get the basic shape, but then to make it my own model i changed aspects of it to make my model "alien-like". to make the cockpit i started off with a sphere, i then changed the hemisphere to 0.5 to make it half size. I then converted it to an editable mesh and played with the vertices to make a flat base for the top part of the cockpit to sit on. For the top part of the cockpit, i used another hemisphere, and deleted one half of it. I then highlighted the outer edges and kept extruding them untill it was a sort of dome shape, after that i extruded a couple more times but i then decreased the size untill the shape close in on itself. For the big gun on the front of the tank i started off with a cylinder, after that i converted it to an editable mesh. I then highlighted various polygons on the front and extruded them to make the decoration on the end of the gun. for the plasma cannons on the back i also started off with a cylinder, i then added a pro boolean which took out part of the inside making it partly hollow. i then extruded the end of it slightly and changed the size smaller to make it point more inwards. For the tank tracks i started off with a tube. I then turned it into an editable mesh and highlighted then end polygons. After that i extruded it several times equal distances to get more polygons in the middle. I then extruded each second polygon on the top and the bottom to make them stick out, then i moved them slightly to the side, to make it a weird sci-fi look. For the material on the tank i used a sub material called "dent". I then changed the first colour to a dark blue, and left the second colour as a dark grey, i changed the size to 200.00, and strength to 20.00, then i changed the iterations to 2. Finally to add the fog I clicked on render, then on environment. Then I added a volume fog, and changed various aspects such as: i changed the density to 6.5, the step size to 4.0 and the max steps to 100. When i was making my tank i came across some problems: As i was making the hemisphere into the stand for the cockpit i had trouble in editing the heimsphere into the shape i wanted. There was alot of vertices and i ended up with vertices under each other and it looked like a big mess, so i started again with the hemipshere, this time only editing the bottom vertices i came out with the result that i expected, and it was much better than the failed attempt before. Also when i was making my model it took me a while to get my volume fog correct. I did not really know what aspects to change to make it correct, at first the fog was too thick and so i toned the size of the fog down and my tank became visible. I really enjoyed making my model as it was a good challenge and I think I did really well with acheiving my original concept, also i did really well with overcoming the challenges i faced and even though i started some parts of the model again, It was good because i learnt what more things in 3d max do and my model came out looking really good.

Thursday, 31 March 2011

Motivational Workshop - Action Jackson

Yesterday we had a workshop from a company called Fix Up UK. we had this guy talk to us about life and how your brain tells you that you can't do something, when in reality you can. He showed us this by putting up a big collage of pictures and images, he then read a story that related to the images, afterwards we all remembered all 24 of the images and it showed me that i can do it even if my brain says i can't. I think that Action Jackson was brilliant because he encoouraged us all to work much harder and that if we work hard enough we can acheive our dreams

Tuesday, 1 March 2011

The bottom four icons are the finished ones i have made by myself

our task was to create five icons based on the four themes- Horror, Fantasy, War, and Sci-fi and another one using a model we had made in 3d max. For my first icon i drew a rocket with smoke behind it, i edited it on photoshop and added a lichtenstein effect to the colour, for my second icon i drew a charatcer in manga and gave him a sword i also edited it in photoshop and added a gradient background of green and blue because these are colours that are used in fantasy. For my horror icon i drew a picture of a skull and a knife, i then added a blood effect to the knife and coloured the skull a bright white. For my sci-fi icon i drew a picture of a droid and changed it to avoid plagiarism,i then added a gradient effect to the background. For my last icon i simply imported a render of my robot i had made in 3d max i then cropped out the background and added a gradient background.

 This is a professional example of an iphone app icon. This icon is for the game angry birds, it was designed by rovio mobile, this icon is much better than mine because it is a much better quality and is professionally designed to suit the product, this porduct also relates to the game because in the game you start off using this red bird.

Wednesday, 9 February 2011

Today in 3d max we  learnt how to use textures and also how to use the UVW mapping on 3d max, which is a  process called unwrap UVW by highlighting the faces one by one we made an area for putting the photo onto and print screened it on to photoshop. we then made the textures we wanted to make on the house using images from the internet